


AlienVault: OSSEC (IDS) Deployment
- Aryan Ahirwar
- Oct 23, 2020
- 4 min read

In this article, we will discuss of Deployment of OSSEC (IDS) agents to the AlienVault server.
OSSEC is an open-source, host-based intrusion detection system (commonly called IDS) that market itself as the world’s most widely used intrusion detection system that performs or helps us to Monitor: –
Network Anomalies
Log analysis
Integrity Checking
Windows registry monitoring
Rootkit detection
Process monitoring
Real-time alerting
Active response
Policy monitoring
Intrusion detection systems are customizable like a firewall and also, they can be configured to send alarm messages upon a rule’s instruction to automatically answer to the threat or warning as for your network or device.
OSSEC (IDS) can warn us against DDOS, brute force, exploits, data leak, and more external attacks. it monitors our network in real-time and interacts with us and with our system as we decide. It can be used to monitor one server or thousands of servers in a server/agent mode.
Table of content
For Linux
Prerequisites
Required dependencies
Download OSSEC source code
Extract & install OSSEC agent from source code
Installation of OSSEC HIDS Agent
Deploying OSSEC Agent to OSSEC server
Running OSSEC Agent
For Windows
Download OSSEC agent for Windows
Install OSSEC agent
Generate OSSEC key for the agent
Run and verify OSSEC agent is connected or running
Prerequisites
Ubuntu 20.04.1
Windows 10
Root or Admin privileges
For Ubuntu 20.04.1
Required Dependencies
To install OSSEC agent on Ubuntu 20.04.1 there are some requirement need to be installed before agent installation as listed below: –
GCC
Make
Libevent-dev
Zlib-dev
Libssl-dev
Libpcre2-dev
Wget
Tar
You can download this all requirement by simply running this command: –
apt install gcc make libevent-dev zlib1g-dev libssl-dev libpcre2-dev wget tar
Download OSSEC source code
You can download the latest OSSEC source code from the Official release page of GitHub or simply running this command: –
wget https://github.com/ossec/ossec-hids/archive/3.6.0.tar.gz -P /tmp
Extract & install OSSEC agent from source code
Once the source download complete you can extract it by simply running this command
cd /tmp
tar xzf 3.6.0.tar.gz
In manner to install OSSEC agent navigate to the source code directory and run the installation script as shown below
cd ossec-hids-3.6.0/
./install.sh
Further then select your installation language or press ENTER to choose default installation options and follow the steps as described below: –

Specify the type of installation. In our case we are installing an OSSEC-HIDS agent, so we go with the option of the agent.
Choose the installation path. By default, it is /var/ossec or you can define the path as per your environment.
Enter the OSSEC-HIDS server IP or AlienVault server IP.
Enable the system integrity check.
Enable rootkit detection.
Enable or disable active directory response.
Once you are done with defining the default options, proceed to install the OSSEC agent by pressing ENTER
Then after press ENTER to close the installer as shown below
v
Deploying OSSEC agent to AlienVault server
In a manner the agent to communicate with the server
You need to first add it to the HIDS server or AlienVault server
After that extract, the agent authentication key from the AlienVault server
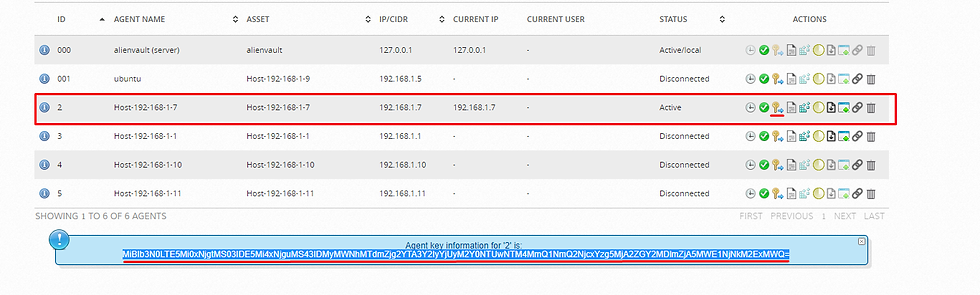
To extract agent key from server, go to the AlienVault Web UI and then navigate to Environment > Detection as shown below: –

Then select or add Agent where you installed OSSEC agent and then extract or copy the key as shown below

Once you have extracted the key, Import the key on the agent simply by running the following command: –
/var/ossec/bin/manage_agentsEnter I, paste the key that you copied from AlienVault Web UI and confirm adding the key then exit from the window by pressing Q as shown below

Running OSSEC agent
Once the installation completes starting the OSSEC agent simply by running the following command:
/var/ossec/bin/ossec-control startOr
systemctl start ossec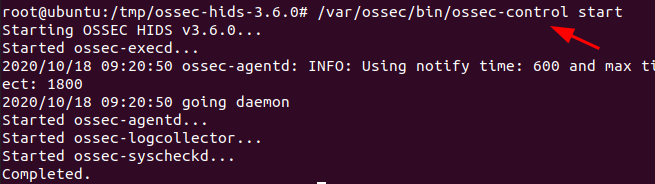
To stop the agent run the below command
/var/ossec/bin/ossec-control stop
Or
systemctl stop ossec
Other service control commands are described below.
/var/ossec/bin/ossec-control {start|stop|reload|restart|status}To check the status.
/var/ossec/bin/ossec-control status
check the logs to see if the agent has connected to the server.
tail -f /var/ossec/logs/ossec.log
As you can see the agent is successfully connected to the AlienVault server
Congratulations !!! you have successfully deployed your Ubuntu machine to the AlienVault server
For Windows Machine
Download OSSEC agent for Windows
You can download the OSSEC agent for windows from the OSSEC official page
Locate and select package Agent Windows ossec-agent-win-32-3.6.exe or the latest one as shown below:

Install OSSEC Agent
Go to the Downloads and run the OSSEC agent installer and hit next as shown below

Choose the path where you want to install the OSSEC agent and hit install

Further, then wait for the setup completion and then hit next
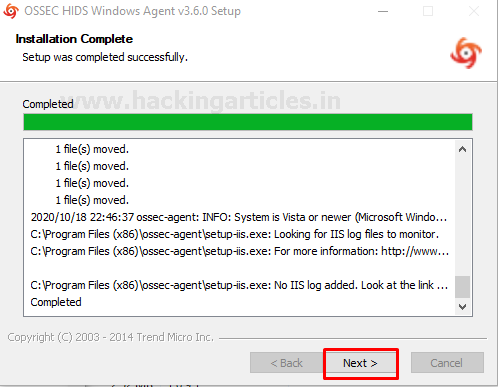
Select finish and then exit from the installer.

Generate OSSEC key for the agent
Follow the steps as described below:
At AlienVault Web UI go to “Environment > Detection > HIDS”
Go to Agents (top right corner)
Add a new agent
Copy the key and use it at the agent as shown below
Come back to the windows machine
Enter the AlienVault server IP and paste the key as shown below

After that confirm agent deployment by pressing ok

Run and verify OSSEC agent is connected or running
After a successful deployment of OSSEC agent start service of OSSEC agent by navigating to “Manage > Start OSSEC” as shown below

As you can see the server is started successfully

A new windows service can be found at OSSIM Web UI as shown below
Congratulation !!! you have successfully deployed your windows agent to the AlienVault server.

Hmm…
Let’s verify it checking the logs of windows machine it is processing or not by navigating to “Analysis > Security Events (SIEM)”

Where 192.168.1.7 is my windows machine IP
As we can see the windows machine started sending the processing logs.
Hold tight! this is not enough…..
Have patience …
In this article, we explained the Deployment of the OSSEC agent to AlienVault OSSIM.
In the next article, our focus will be on the Threat Hunting, Malware analysis, network traffic monitoring, and much more…
Author – Vijay is a Certified Ethical Hacker, Technical writer and Penetration Tester at Hacking Articles. Technology and Gadget freak. Contact Here


Comments